
Online Tutorial.
If you enjoy building kits, this is simple !
If you have any experience soldering, or working with small parts, then this tutorial may be a little too simple, but there are some very good visual aids which will help even the most experienced kit builder.
If you have no experience soldering, especially small parts, then please take the time to read and heed the notes here about cautions and tricks.
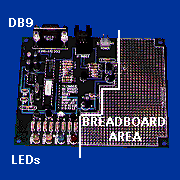
Here is a picture of the finished kit :
There aren't that many parts,
only half the board has any.
|
|
 What to Buy
You will have to buy the LynX Kit from your favorite distributor, but while you're waiting for it you should take a trip to your local Radio Shack or electronics shop and pick up some things that you may need or want.
Although the LynX kit is 'technically' complete, there are a few things that would make a better kit.
Sockets for all chips are good insurance. These are the parts that are the most difficult to remove if they are not socketed. The kit normally comes with a socket for the largest chip U1, but most often not with sockets for U2 and U3.
These sockets are very common, and are available from your local Radio Shack. Please check the part numbers in the List of Parts.
 Tools you will need
Of course you're going to need a soldering iron, but a pair of close-cutting snips and a wire stripper that will handle smaller wires will make it easier and neater. (along with saving your teeth)
You will also need a supply of small diameter rosin multi-core solder, and a small wet sponge (wipe the solder iron tip frequently).
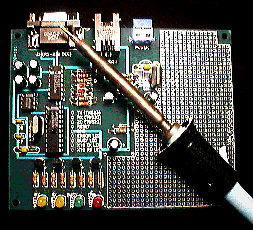
You don't want a big soldering 'gun'.
This 25 watt iron with a small tip is perfect.
|
Wire cutter/strippers and a "Snipper"

|
 Getting Started
Start off by finding enough space, where you will have very good light. I like to lay a towel down just to keep parts from rolling around. But do remember that the soldering iron will be hot enough to start a fire. An up-turned disposable aluminum biscuit pan makes a good temporary rest for the iron.
The solder iron will take a little time to come up to temperature, so lay it out first and make sure that you won't be tangling in the cord as you work.
 Sorting out the Parts
There aren't that many parts, so just shake them out and begin to sort them by size and colors. The chips are easy, and their sockets.
Many of the parts are going to look very much alike and you will need a little help determining just which is which.
Please note that some substitutions of parts do occur occasionally (sorry, totally out of
our control). This may be particularly confusing with the smallest parts which are
not marked clearly or have very tiny marks.
Also, some of the parts must be properly oriented when they are inserted. This orientation is called 'polarity' here, but only refers to the fact that it matters which end is which.
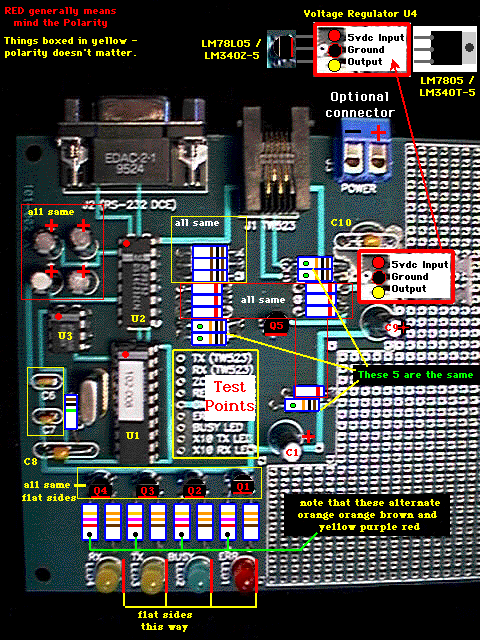
In order to make it easier, here is a pictorial Parts List, you should refer to it often :
Here also are some different views which are meant to help with perspective :
an angled view from the 'south-west'.
an angled view from the 'north-west'.
a view of the face of the connectors.
 The Easy Parts
Let's start with the chips U1, U1, and U3. These are easy because they each have a different number of 'pins'. U1 has 20, U2 has 16, and U3 has 8 pins.
IF you have sockets for these chips then of course use them here instead of the chips themselves. You can insert the chips later, again minding the orientation.
Notice that the chips and the sockets have a small half-round notch at one end. This is the 'pin-one' end, and in our board, all of the chips must be oriented so that this notch is pointing 'North'.
|
|
You may have to bend both rows of pins in order to make them fit into their proper holes. There's an art to doing this a lot, but you should be able to bend all of the pins in one row at a time, being very careful not to 'flay' them. A nice straight line of pins will literally fall into the proper holes.
Starting with U1, drop the socket (or chip) into the holes marked for it, and bend the two pins on each end on the back side so that they just hold the socket into the board.
Now solder each of these 4 pins first, and then the other 18 pins. If you don't have a socket for U1, please take care that you do not overheat any of the connections. If you follow the soldering procedure, each of the joints will take less than a second to 'seal'.
Do hold the socket with a finger while making the first four joints, making it seat flatly with with the level of the board.
 Do the same now for the other chips U2 and U3.
Now let's be neat and use the 'snippers' to clip of the ends of the pins which extend out the back of the board
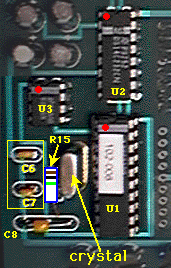
 The crystal is the next part to mount, and it looks like a flattened silver 'can' right next to U1.
This part has no special orientation, so just slip its two wires into the holes to the left of U1, and push it all the way in. Solder the wires, and clip them off on the back.
 Next let's do some of the smaller parts next to the crystal, just for practice.
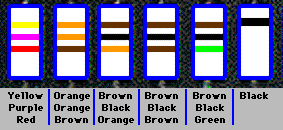
There is one 'odd' resistor which is named R15. It is a 1 MegOhm resistor, and has color bands of Brown, Black, Green.
None of the resistors has special orientation, so just bend the leads and insert it snugly down into the board. Bend the leads, solder them and then clip.
 Next let's do the tiniest of the parts: capacitors C6 and C7. These are located just to the left of the last part R15, and they need no special orientation.
These two are probably the smallest parts in the kit, and should be easy to identify by their size alone. Normally, both of the leads extend in the same direction, and the spacing of the holes should make it easy to drop each into their places, bend, solder and clip.
Please note that C6, C7, C8, and C10 are possibly the easiest to
mistake,
and substitute parts may not be as 'tiny' as described here.
 Now for the next two smallest parts, C8 and C10. C8 is located below C7, and C10 is in the upper right hand corner. There is no special orientation for these.
These two are only a little bigger than C6 and C7, and their leads may extend out the ends in opposite directions. You will need to bend them before inserting, but it is obvious just where they go by the white outlines. Insert, bend the leads, solder and clip.
 Next, let's get adventurous and do some of the most tricky parts :
Resistors R1 thru R8 are really two sets of four, each set with different values and therefore different 'color codes'.
This will help you sort out the different values :
|
|
Locate 4 resistors with color bands : Orange, Orange, Brown ( R1 - R4 )
and 4 more with color bands : Yellow, Purple, Red ( R5 - R8 )
Notice that all 8 of these are aligned in the same way and all in a row near the bottom of the board, near the LED's.
These resistors must be inserted so that they alternate from one value to the other for a total of 4 in each set.
Starting with the left most location (R8), insert one of the Yellow/Purple/Red ones, and
bend the wires on the back slightly.
Then choose one of the Orange/Orange/Brown ones and insert it in the place for R4, and bend the leads. Repeat this until each of the 8 resistors is placed like you see near the
bottom of the main overview picture.
Look at them and be certain that you have properly alternated the two sets across the whole row. It is very easy to move them now, after you solder and clip it may not be 'fun'.
Now solder each of the connections, and clip the wires.
 Getting good at this now, let's try some more tricky parts, the Diodes
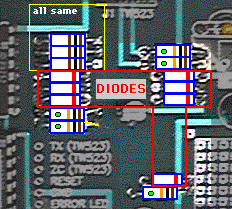
Near the center of the board, there are two sets of three very small parts which look like they are made of glass. These all have a black band at one end.
These parts must be properly oriented but it's easy to remember that all of them on this kit are pointed in the same direction..
|
|
The leads of the diodes extend out the ends, and need to be bent to fit into their marked holes. Bend them, and insert each, minding that the direction of the 'black band' is to the right. Bend the leads on the back, (look again at the orientation), solder, and clip.
Now there is only one more of these diodes D7 (you worried ?). It is identical to the other 6, and is inserted in the same orientation. Find it to the right and down from the first six.
Insert, bend, check, solder, clip.
 Fill in some of the resistors in the center of the board.
Start with R10, R11 and R12, which are all Brown, Black, Brown, and all go in a row. Insert, bend, solder, clip.
The last 5 of the resistors (R9, R13,R14,R17), are all Brown, Black, Orange, and are all pointed out in the picture with little green spots and a comment. This doesn't mean anything special, just pointing out that they're all the same value.
Insert, bend, solder, clip, and we're done with the resistors.
 The Transistors
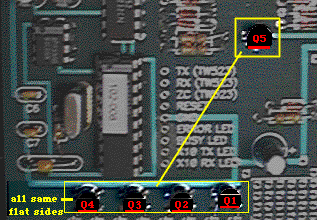
There are 5 small black parts, each with three leads. They are all the same, but you must mind the orientation. Each has a 'flat side', normally with writing on it. (you may need a magnifying glass like me).
This will help you sort out the different values :
|
|
Holding each with the flat side toward you, gently bend the center lead toward you, so that the pattern of the three leads looks like the triangle pattern on the board.
Bend each of them and insert them into the five locations which have that similar semi-circle painted on the board. Q5 is near the center of the board and oriented the same way as the others.
You should insert all and check for orientation before soldering. There is ample space between the four that the leads shouldn't get tangled.
Solder them and clip.
 The large Capacitors
These look like little tin cans, and you should be able to read their values, at least easier than the smaller parts.
There are six of them, but there are three different values :
C2, C3, C4, C5 = 4.7µF
C9 = 47µF
C1 = 22µF
You must be very identify C9, as the one 47µF part. It may be difficult to see that it does not have a decimal point between the 4 and the 7. The only part with the numbers 22 is always C1
NOTE that all of these should have some sort of stripe or marking which identifies the polarity of the leads. Normally, and in the picture, there is a light colored stripe which marks the negative lead.
Start with C1, the leads should fit easily. Bend, solder, clip.
Next do C9, and bend, solder, clip.
The remaining four large capacitors are all the same, and fit neatly into a pattern in the upper left of the board.
Minding the polarity is the same for all 4, insert and solder only one at a time because it is a little tight in that area. Make sure you double check as you insert and solder each.
 The two large Connectors
Let's do these next, starting with the smaller J1 which is the 'phone' like connector which connects with the TW523.
The leads of this connector may have become squashed, so make sure that they are straight and place the connector on the board. You'll see that there are two plastic 'pegs' which fit tightly into their holes, and if you've squashed one of the 4 pins, you'll have to squeeze both of the pegs at the same time to get it back out...
When it seats well, solder up the pins and clip off any excess.
Now, the large connector J2 which is the serial port connector, has an even more nasty pair of 'pegs', so you need to make sure that the 9 pins are nicely straight before you push it down into the board.
Solder the pins and maybe clip?
 OK, we've waited long enough, let's put in the LED's.
By the picture you can see which colors go where, and that each must be oriented with the flat side of the base to the right.
Insertion is easy. Bend, solder, clip, all four.
 Only one (or two) more parts to solder !
The most important part is the voltage regulator because it will convert the voltage from the wall transformer into a regulated voltage for the computer.
It is also problematic because there are two different parts that might be included in your kit.
The manual that you get with the LynX Kit should have a page regarding the differences between these two parts, but in general, the main thing is the polarity.
At the top of the main picture, you will see a graphic about the different parts which go into the position called "U4". Turn the part you have in the proper orientation, and insert it into the three holes which are in a straight line with each other.
(There is 4th hole near the center pin, but offset...Ignore it.)
Do not insert the pins all the way, but leave a little length to allow the part to extend above the board as seen in the picture. Solder and clip.
 Power Socket ?
You will have received a wall-mount power transformer which has a plug on the end of its wires. You must make a decision here as to whether to cut off the plug and just solder the wires to the board, or to make another connector which will allow for disconnect of the power transformer without de-soldering.
If you are a purist, or really don't like solder, then you can get another connector like the bright blue one in the picture, or perhaps an easy disconnect of your choice.
Otherwise, you need only cut off the plug of the transformer, near the plug, giving the length of cord that you need.
Here is where you will need the wire cutter/strippers:
Cut off the plug, carefully split the two wires with your fingernails, 'un-zipping' the wires for about one inch.
Now use the wire strippers, and carefully strip 1/4 inch of the plastic/rubber insulation from the ends of the two wires.
Twist the strands of each of the two wires so that they are in a nice tight bundle, and then touch the soldering iron and a little solder to them so that they are filled, but not bulging with solder.
 Now we have to determine which of these two wires is positive and which is 'negative' or 'ground'.
Because there is no way to predict what brand/model of wall 'wart' you received, you must either own or borrow a multimeter and determine which wire is which.
Of course if you measure DC voltage, you will see a positive voltage when you have the positive lead of the meter connected to the positive lead of the wall transformer. If you have the leads reversed, you should see a negative value (just reverse the leads).
Now, having found which is the positive wire, either screw it down into the Power Connector ( you're a pro ), or solder the wires directly to the holes labeled "Power".
The picture above shows that the positive wire should be on the right.
 S T O P
Please check everything before you plug in
the wall transformer for the first time.
 If you are sure that you are ready....
PLUG IN THE WALL TRANSFORMER !
All of the LEDs should light up and then all go off
If you do not see this behavior,
immediately turn the power off, pull the plug.
(smoke or noise are also good reasons to power down)
 IF everything looks OK, then lets venture further :
The next thing you need is a serial cable and a copy of XTension for the LynX .... :-)
Connect the serial cable to the Mac, and start up XTension !
If XTension sets itself up correctly, and it's not in monitor mode, then you should be able to pull down the "LynX" menu and select "Check Interface".
You should see a message in the "Log Window" indicating that the LynX has been located, but you my also get a message saying that there is a problem like "Carrier Lost or Power Failure at the TW523". This is OK for now.
 Let's go all the way !
You should have gotten a TW523 when you ordered your LynX Kit, so let's connect the 'phone cable' between the TW523 and the LynX J1, and plug it in to a convenient wall socket.
(You should have gotten this 'phone' type cable with the LynX and the TW523. If you did not,
please make sure that the cable you use has 4 wires, not two....)
Now you should be able to issue a command from XTension.
Do this from the Control Panel or any familiar way.
Try to turn a lamp on or off, and then try to dim one.
If you have problems with the dim, but not the on/off, then you have a conflict with your XTension prefs. Quit XTension, find the XTension Prefs in the System Folder:Preferences, and throw that file away. Restart XTension, and see that dimming works fine...? )
 OK, How about INPUT ?
Whether from a wireless remote, or a plug-in X-10 controller like the "Mini-Controller",
try to turn on/off or dim the same lamp.
You should see a message in the XTension Log Window in response, each time you send.
If you are here, then you're home free !
Now go back to those tutorials...!
 Troubleshooting
(in work ..... :-)
Copyright 2007, Sand Hill Engineering All rights reserved.

Last modified: May 4, 2002
Michael Ferguson, webmaster@shed.com


![]()