
RFID READER DEMONSTRATION PROJECT
This project is an example of using an inexpensive RFID tag system with XTension. The intended use is to place the RFID reader some distance from the Mac (such as an entry gate/post at the street). The distance needs I have is the reason I went from TTL (from the RFID reader) to RS422, which should be able to give me about 1,000' of distance over Cat5, using just 2 wires. The Mac serial port also is RS422, but apparently it also accepts RS232. The Texas Instruments SN75179BP does the TTL to RS422 conversion.
The goal was to create an RFID interface to XTension where "scenes" in XTension can be triggered by each unique RFID tag. For example, if the reader is placed near an entrance to a house, each member of the family could have his/her own ID tag. The tag would be passed near the reader and Xtension would take over there, logging the person's tag swipe, turning on welcome home lights and music, turning on HVAC, or whatever.
PARTS LIST:
* Can be obtained from www.mouser.com. Shipping is way more than the parts.
READER WIRING SETUP
The image below is the basic assembly and wiring on a project board. See the packaged version below.
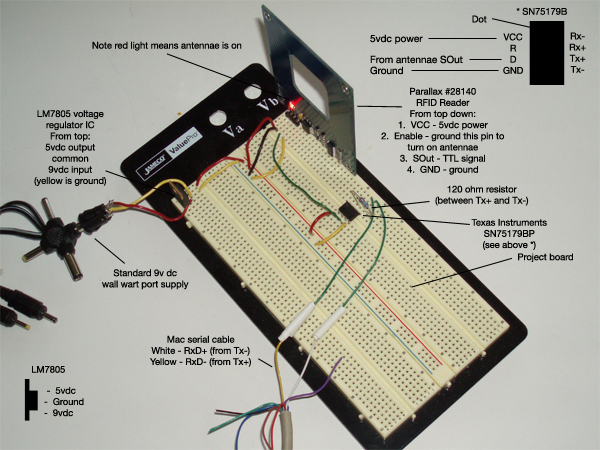
NOTE: Because the RFID reader transmits data only and does not receive data (at least for this project), you really only need 2 wires from the reader to the Mac. If you want to run the 9vdc to the reader through the Cat5, you will need 2 wires for that.
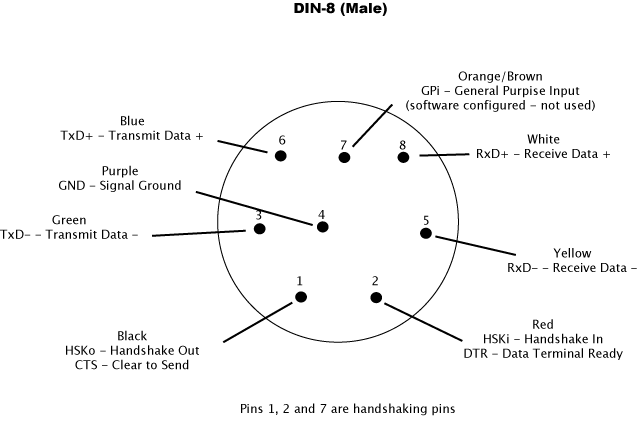
Here is how a Mac DIN-8 serial cable is wired:
RFID READER APPLICATION SET UP
1. Set the serial port.
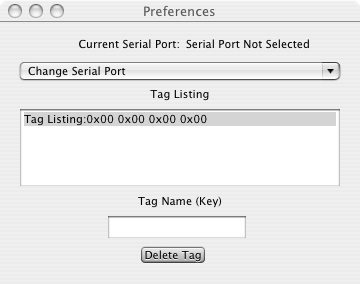
Get the RFID Reader application here. Open RFID Reader and go to Preferences. There you should see a pull down menu showing your available serial ports. Select the port where you have the RFID plugged in, close the Preference window, and then quit the application (see *).
Next, open the RFID Reader application and you should see the serial device selected in preferences.
2. Add ID tags.
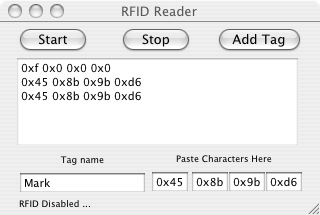
Open the RFID Reader application and press "Start". Place an RFID tag within 2" of the reader and you should see some tag IDs appear. What you're looking for is a consistent tag ID. Maybe in a future version of RFID Reader I can have the app select a consistent ID, but this solution works for now. Once you have a consistent ID, you're ready to add the tag ID and the tag name. The example below shows a good tag ID:
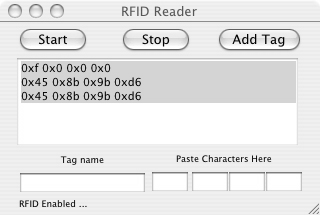
Next, stop the RFID reader (press "Stop"). Note: if you don't stop the reader it may crash when adding the tag - I am working on this*. and cut and paste each of the tad ID elements (these are actually in hex) into the boxes indicated by "Paste Characters Here". Then name the tag, and press "Add Tag". Quit the application and restart (see *).
After you restart, you should see the tag listed in the Preferences window.
Next, set up XTension as discussed below, and when that's done, open up RFID Reader and you should be good to go.
If you run into problems, you can try deleting the preference file located at ~user/Library/Preferences/com.rudeboysrecords.RFIDReader.plist" (see *).
2. Quit RFID Reader.
XTENSION SETUP
The RFID Reader checks for a valid tag, and if found, sends the AppleScript command "tell application 'XTension' to turn on [tag name]" to XTension (with [tag name} being the name you give the tag). For now, the RFID Reader application has to be on the XTension machine.
All you need to do in XTension is create a pseudo unit with the same name as your tag name, and in that unit's "on" script, put in this code:
say [tag name] checked
in
block unit
[tag name] for 5
(Be sure to substitute your real tag name for [tag name]).
The "on" script is where you will add all of the code for the behavior you want from a tag swipe, such as turning on certain lights, starting an iTunes playlist for a particular person, opening doors, gates, etc. The "block unit for 5" is there because the RFID reader sends out multiple series of bytes for a single tag swipe and this block prevents the on script from restarting. You will need to play with this to get the timing right for your on script code.
Go back to RFID Reader, press Start, and pass the tag near the RFID reader antenna. XTension should respond by causing the Mac to say "[tag name] checked in".
PACKAGING
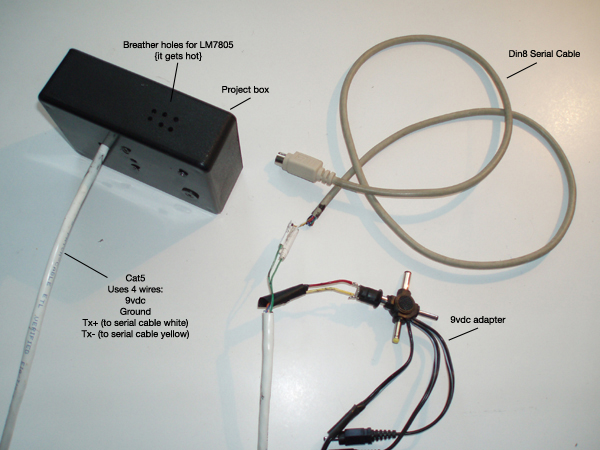
I put all of the components into a small project box, with the RFID reader attached to the lid and the project board with the other components on the bottom of the box. Make sure the LM7805 does not touch anything as it gets really hot. I drilled a few holes on each side of the box for ventilation. I have about 100' of Cat5 between the reader. Here's what the end product looks like (NOTE: the LM7805 gets HOT. It probably needs a heat sink of some sort):
I have this setup attached to a wall by my from door with the Mac about 50' away using Cat5. So far, it works as intended (but see the notes below regarding the RFID Reader application issues).
DISCUSSION AND TO DOs
This project uses a "passive" RFID reader/tag system. Essentially, the power in the reader/antenna (an "RFID interrogator") sends out radio waves that activates a tag (an "RFID transponder") passed within a 2" distance, causing the tag to power up (using "parasitic power" to the microchip in the tag) and send its ID data to the reader. The reader then sends the data out in the form of a 12-byte ASCII string over TTL serial communication (2400bps, 8 data bits, no parity, 1 stop bit).
The RFID reader sends its data out as "TTL" (transistor-transistor logic), which varies the signal between logic "0" (or +.8 volts to zero) and logic "1" (between +2 to +5 volts). TTL logic only needs 3 wires: transmitted data, received data, and a common ground. RS232 and RS422 (which is the Mac's serial protocol) uses 0 volts and +5 volts for its data signal, so a voltage converted is needed. That's what the SN75179B does. RS422 is really a "balanced" version of RS232 which allows longer runs of wire, because a balanced signal is not as susceptible to noise from lights, etc. In fact, RS422 is used for long serial runs for industrial applications in warehouses for that reason. RS422 needs 4 wires: 2 for the receipt of data (Rx+ and Rx-) and 2 for the transmission of date (Tx+ and TX). For this project, because we are only sending data to the Mac and not receiving any data, you only need 2 data wires between the Mac and the reader (plus 2 more if power is sent to the reader as opposed to power being supplied at the reader).
I would eventually like to get an "active" system going that would allow a much greater distance between the reader and the tag, allowing someone to simply walk or drive by the reader rather than getting a swipe 2" from the reader. The cost of active systems is much greater. In addition, the tags need to be powered.
Right now this application sends an AppleScript command to turn on a particular XTension unit. The code can easily be modified to have that command sent to an XTension machine on the network (see the "readSerialPort()" function in RFIDReader.m file in the Xcode project file), or to send any other AppleScript command(s) for that matter.
The RFID Reader app and known problems
I used this project to learn Xcode, Cocoa, Objective C and serial communications, so the RFID Reader app is definitely alpha. Here are the known problems I am aware of with this version:
Mark J
Updated 6/20/07