XTension Logo

Garage Door control and more Sensors.

In the previous tutorial, we learned how to lock and monitor the garage door, and basic ideas for using two motion sensors to determine whether motion on the driveway means someone is coming in, or they're leaving, or maybe it's just an intruder !

This time we're going to provide XTension with a way of controlling the Garage Door.

You will want to download the 'plug-in' for this tutorial and import it into the XTension DEMO database in order to make it fit with the other scripts and units that have already been created.

How do we get control of the garage door opener ?

Think about the garage door opener. We have already created a 'lock' mechanism for it, and one sensor which tells us the door is or is not closed. But we still can't open the door from XTension, and we need to tighten up some of our scripts.

Many brands of door opener provide some sort of a 'button' on the wall which will command the garage door to open or close, depending on its current position.

If we could push that button from XTension, we could command the door to change positions at will.

If your model has only a 'wireless' button, or one with both UP and DOWN buttons, then this tutorial will only give you a 'piece' of the solution. A later tutorial, or a little inventiveness with this one will provide a more complete solution.

There is a common X-10 'module' which can receive X-10 ON or OFF commands, and 'close' or 'open' a contact accordingly.

This means that you can 'push' the garage door button from XTension by simply turning on a X-10 unit !

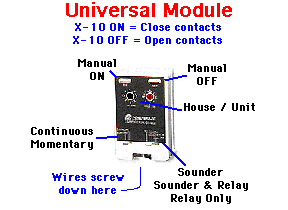
Here's what the 'Universal' looks like, and some pointers to its 'option switches' :

Universal Module

Although we're only going to use this device to 'push' the garage door button, it's much more flexible, and you'll find many more uses for things like the 'Sounder' (really a 4-pulse 'beep') and there is an option to either automatically turn off the 'relay' in 4 seconds, or to keep the contacts 'closed' until commanded 'open' (momentary vs. continuous).

You may need to 'experiment' !

Some door openers are sensitive to the length of time that you hold the 'button'.

If you push your door opener button and hold it IN, does the motor stop or reverse itself after a while ?

How long do you have to hold it IN before it reverses itself or stops?

If you can hold it IN for TWO SECONDS, without it reversing itself, then it is likely that this tutorial will offer a reasonable solution.

Some systems may be very sensitive to the length of time that you hold the 'button' IN, (ON), and sorrowfully, there may be no simple way of solving your problem. This requires some 'surgery' on the Universal Module, a subject we'll cover in a later technote.

OK, let's give it a try !

Don't worry if you buy a Universal Module and it won't control your garage door opener. Odds are that it's going to be useful in other things later...(promise).

Remember that with XTension you can 'simulate' any unit or system. Whether you have the universal module, or ANY of the units here, you can still play along.

You need to plug in the Universal Module (UM) 'near' the garage door 'button'. The only real consideration is the distance between the UM and the garage door button.

See that there are two screws on the UM ? Notice also that there are two wires going from the button to the garage door opener ?

We need nothing more than two wires which are long enough to reach between where the UM needs to plug in, and wherever we can "tap into" the wires going to the garage door 'button'.

Unplug the door opener from its wall socket.

Take the garage door button apart and locate the screws where two wires are already connected. Strip a little insulation from the ends of the new wires; then back off the two contact screws enough to allow both the original wires and the new ones to be securely screwed back down.

Now take the other ends of the two new wires and connect each to one of the screws on the universal module.

You can now plug the door opener back into its socket. The universal module should be plugged in and you need to 'tidy up' the wires. Don't leave them dangling and dangerous.

The Universal Module is now connected to the Garage Door button.

A script to make it work

Let's write a script which corresponds to the "Garage Door" universal module. We need to simply add a "ON" script for the "Garage Door".

( Select the "Garage Door" in any window, and do a keyboard "Option-O" )

The edit script dialog box appears, ready for you to enter a new script (of course, it's already there if you've imported the plug-in ).

Here are the scripts as they should be assigned to "Garage Door" in the database :
Note that the OFF script is empty !


Garage Door ON

-- Whether to open or close the door, we need to
-- hit the button and let go quickly...

turn off "Garage Door"


Garage Door OFF

--We leave this script empty, but it might
-- be useful for something later ?


The assumption is that the garage "Door Lock" command is sent before the ON command for the "Garage Door" as in the I'm Leaving script. Else the door isn't going to be able to open.

Another assumption is that the "Garage Door" will normally be commanded by another script, rather than directly from some remote.

The reason for the "turn off" is because we want to 'let go of the button' before the Garage Door opener gets upset and begins to reverse itself.

To make things simple, we will treat the "Garage Door" as an object that takes care of itself. Whenever we turn it on, it will 'let go' as quickly as possible.

Please note that if you have a 'two-button' door switch, or your system isn't sensitive to how long you hold the button, then this quick-acting switch may not be necessary.

Also, we still have the original button intact, and it can be used as before. As a reminder, this is what we always want to do. Augment your systems, but leave them in a condition so that you can use them even when the computer is down.

Now for an example script which needs to control the "Garage Door".

The original version of the "I'm Leaving" script already does much of what we need, let's just add a little more control and horse sense :

I'm Leaving

--This script runs when you're leaving the house
-- and the house will be empty

--Unlock the garage door for a while and
-- give ourselves some time to get out...

turn on "Garage Lock"
turn on "Garage Door"
execute script "Guard the Home" in 10 * minutes
Guard the Home

--This script will set the house into "ARMED" mode
-- It should only be set when the house is empty.
-- ( pets are another item...)

--in this example, we control the garage door, so
-- we have important things to do.

--IS the garage door open ?
if status of "Door Open" is true then

-- IS there motion in the area ?
if status of "Front Walk Motion" is false then
turn on "Garage Lock"
turn on "Garage Door"
end if

set value of "Verify Count" to 0
execute script "Verify Garage" in 2 * minutes

else
-- the door is closed, we need only lock it.
turnoff "Garage Lock"
block unit "Foyer Chime"
unblock unit "Rear Porch Motion"
write log "All sensors are now armed"
--
end if


Now our "Guard the Home" script is a little more complex, and is a beginners view of how you can make some very careful 'sequences' where one script can 'trigger' another and so forth.

The "Guard.." script is now responsible for making sure that the Garage Door is closed, and if it isn't, it will try to close it. The script "Verify Garage", is necessary only if we find that there is motion near the garage door. This is a good reason to delay, and maybe even sound the 'beeper' on the Universal module !?.

See that we set the "Verify Count" to zero above? We're going to use that as a counter to keep us from getting too frustrated if the garage door refuses to close !


Verify Garage

--This script will try to close the garage door
-- But it will try only three times...

--IS the garage door still open ?
if (status of "Door Open") is true then

-- IS there motion in the area ?
if (status of "Front Walk Motion") is false then
turnon "Garage Lock"
turnon "Garage Door"
end if

set value of "Verify Count" to (value of "Verify Count") + 1
if (value of "Verify Count") is less than 4 then
execute script "Verify Garage" in 2 * minutes
else
-- we're having trouble closing the door ...let someone know.
beep
write log "Unable to close the garage door ? "
end if
else
turnoff "Garage Lock"
write log "The garage door is now down and secure"
end if

Verify Count

--This 'unit' doesn't need any scripts, it is just a
-- way of counting things ....


One of the little lessons of this script is the use of the "Verify Count" as a simple 'counter'. We use it here to 'limit' the number of times we try to close the garage door. You may choose to increase this number, but in any case this is a good idea whenever dealing with motorized appliances which can in themselves fail.

We have created only one script which calls upon the "Garage Door" system, but you can see how you might use the techniques in other places.

Now, if for some reason you leave in the morning without closing the garage door, your system will do its best to close it for you.

You will want to change these scripts perhaps to sound more or less alarms or to trigger other scripts. Please understand that these are only suggestions and not intended to be complete solutions.

You will also want to explore other scripts which need to control the garage door, no doubt you will find that each has its own little 'quirks'.


Home
Back to Home Page
more
Tutor Index
next
Lasers and Magnetics !


Copyright 2007, Sand Hill Engineering All rights reserved.

Mac Made

Last modified: May 8, 2002
Michael Ferguson, webmaster@shed.com