XTension Logo

A very simple starter system for driveway sensors,
lighting, and some basic garage door security.


This tutorial assumes that you are familiar with XTension or have at least seen the basic tutorial.

You get ready to leave the house, and press a wireless command saying "I'm Leaving", and your system begins to arm itself.

First, it enables (unlocks) the garage door opener so that when you push the button on the wall inside the garage or the wireless remote that came with that system, the door can open.

The garage door opens, and you pull out, remembering to push the wireless, closing the door behind you. As you pull out the driveway, motion sensors detect the car, and if it's still dark out, the driveway lights come on to guide you out. Shortly after you're gone, the garage door is again 'locked' and the lights go off.

While you're gone, should any thieves think of 'spoofing' your garage door system, they will not be able to just 'luck on' your code and open the garage. They will need to know how to enable the 'lock' system first, and there's no way to know that they have to. (sneaky !)

Later, when you return, as you pull into the driveway, if it's dark, the floodlights and the front yard lights come on giving you a clear picture of the drive and the area, and giving you a pleasant 'welcome home'.

If the time of your arrival is known by the system, then the Garage Door will be 'unlocked', and you can simply press the button on the door remote, and drive in. As the door opens, the light in the garage also comes on.

You push the button to close the door, and the system detects that it is down, and shortly thereafter 'locks' the garage door and shuts off the driveway and front yard lights, and perhaps the garage inside light.

You choose how long you want the lights to stay on, or the door to remain 'locked'. You know how long it takes to get from the car to the front door, and if you choose to go in the rear, then the rear motion sensor will turn on the lights for you there.

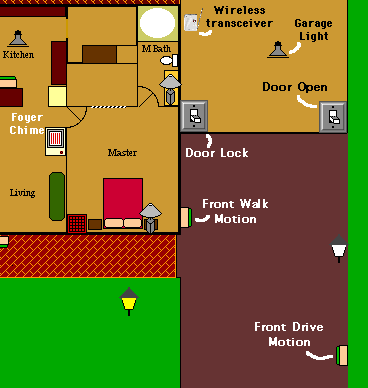
Let's start with a simple layout. Here is a part of the graphic View that is included in the DEMO database :

driveway section

Want to make it easy ?

You can create everything by hand, but I suggest that you start with the DEMO database which is included with the XTension demo package, (on the website), and IMPORT the driveway plug-in which has been made for this tutorial. Although there's enough here to understand most of it, you will benefit more if you have XTension running now (even the demo version will do).
Download the driveway plug-in NOW

You may need to 'expand' it, but it becomes a file which can be imported by XTension. Simply pull down the Database Menu, and select "Import". A common Mac file selection dialog will let you choose the new plug-in "drivetutor1".

When you are asked about 'duplicates', choose the "Use All New" option, or you will be bugged several times for an OK. After the import is complete, XTension will create a new List which includes each of the new Units that were imported.

In this example, we don't really need to assign X-10 House and Unit addresses to the units in the database, because you will have to make them be what you want, and for the purpose of this tutorial, you should be able to 'simulate' everything without them. Do remember to assign these in the Edit Unit dialog when you finally set up all the real devices.

What kind of motion sensor should I use?

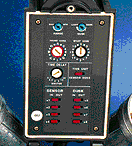
You need a couple of motion sensors for the driveway, and for the purpose of this first system, let's assume that you're using the common PR511 Passive Infrared motion sensor which also includes a dusk sensor and even a pair of floodlights.

motion/floods
PR511 controls

These units can be set so that they will automatically turn on their floodlights at night when they sense movement. We'll just use that capability to keep things simple, and they will even work like you want and even turn on the lights when the kids have crashed the computer with the latest copy of DOOM.

In addition, you need to set the unit so that it actually sends an X-10 signal ON and OFF to a specific address whenever it senses motion and later 'relaxes'.

First you have to set the base house and unit code for each of the PR511s. This is the familiar pair of dials. Let's assume for now that you set the address of the Front Drive Motion sensor to A1.

Now set the SENSOR +1 switch to "IN", which means that whenever the motion sensor detects motion, this unit will send a X-10 ON signal for unit A2 ( A1 + 1 ) which we will use in XTension to mean "Motion at the front drive".

For the Front Walk Motion sensor, we'll use a base address of A8 which will make the PR511 send a A9 ON when motion is detected, and like the front drive sensor, it will delay a while after it last sees motion before sending a A9 OFF.

( Please remember that the plug-in may not have these already set.)

Where to put the motion sensors ?

Let's put one of the sensors at the entry of the driveway, but far enough in that it won't be tripped by a bicycle on the sidewalk, or a car just turning around. We might even aim it away from the street, but just so it covers the driveway.

The other motion sensor should be placed so that it is only tripped when motion is seen within 10 feet of the garage door, or so that at least the front of the car would trip it when you stop to open the garage door. It should also be pointed at a 'cool' background, rather than at something like a sun-lit brick wall.

In a later tutorial, we'll use this sensor to make sure that there's no one moving near the garage door before we decide to close it automatically.


Use what you got!

Now for the garage door, you want to augment your existing door opener system rather than taking it over. You'll come to see that this is also a good philosophy for any of your home systems like this. Monitor and augment, but take advantage of the redundancy.

Remember why they came out with the 'zillion' codes for the wireless door openers? It was because the thieves got smart, and drove through suburbia with a device which would discover the simple codes and they just look for the doors that open and call in the trucks.

Well, they are smart enough to spoof the new ones too. This system will be a start on what will become a pretty good system for doubly-assuring the security of that big gaping door on your world. The thieves can spoof X-10 too, but combining the two different technologies, will discourage all but the most clever or the most stupid.

The door opener system is plugged in to the power lines somewhere in the garage. Let's put a simple appliance module on it so that you must turn on the appliance module with a X-10 command before the opener system is enabled at all.

Usually, all you need to do is locate the power plug from the opener control unit, take it out of the wall socket, put it in to the socket of an appliance module, and plug that into the old socket. Of course you want to set the address of the module at this time.

That's the simple part. The difficult part is detecting that the garage door is or is not closed.

For this, we need a simple switch from Radio Shack, (PART #49-533), which is nothing more than a magnet in a plastic case, and a "reed switch", also in a matching plastic case. When the magnet comes close to the reed switch, the contacts of the switch close and stay closed until the magnet is again moved a short distance away.

(Please note that they also offer several other models which are more robust, and costly)

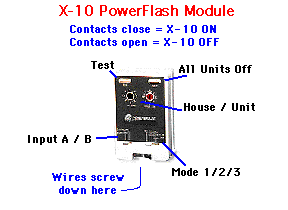
If you connect a pair of wires from the two ends of the reed relay to the contacts of a X-10 Powerflash module, whenever you move the magnet near the switch, you will get a X-10 command that says "UNIT ON", and of course a "UNIT OFF" when it is removed.

powerflash

You must mount the magnet part on the door itself. The switch part will have to be placed on the door post in such a way that when the door is fully closed, the parts line up very closely, and you do indeed see that you get a X-10 ON command when the door closes all the way, and an X-10 OFF when the door begins to open.

Of course, you need to consider the distance to the nearest socket where you can plug in the Powerflash, and the two parts of the switch need to be very well secured or it will bug you until they are.

You may find that it is easier to mount the switch parts at the top of the door rather than the bottom, it doesn't make any difference, so long as they align when the door is closed.

Now we have a way to detect motion on the driveway, a way to 'lock' the garage door, and a sensor which tells us that the garage door is or is not closed.

If you're way ahead of this already, then you will notice that we really are being simple here, but bear with us, all of this will be even more useful with the next two tutorials.


Now let's put it all together with XTension and some scripts.

The Front Driveway Motion sensor:

Although you may later add more motion sensors on the driveway, the frontmost sensor will always have basically the same instructions. In general, it should be responsible for turning on the driveway floodlights (etc), if it's dark, and its X-10 signals will be interpreted as "someone may be coming in", or "someone is leaving".

Since in this first example we are letting the sensors turn on the floodlights automatically, we don't need to specifically control their going on or off at all, and of course visitors always are welcomed or possibly intimidated if their intentions aren't above board.

Here is the only place we'll see reference to the "Driveway Floods", which are just additional lights on or near the driveway.

So the ON and OFF scripts for the "Front Drive Motion", look like this:

Front Drive Motion ON

--This script monitors the front driveway sensor
-- If it goes ON, something is moving there.
-- If it's status is true, there may yet be motion?

if time delta of "Front Walk Motion" is less than 30 then
turn off "Driveway Floods" in 20
else
turn on "Foyer Chime"
turn on "Driveway Floods" for 2 * minutes
write log "Someone entering driveway"
end if
Front Drive Motion OFF

--when the motion sensor 'relaxes', we get an OFF
-- this means 'no motion seen for a while'.
-- We need to make sure we didn't miss the ON !

if status of "Front Drive Motion" is false then

if time delta of "Front Walk Motion" is less than 30 then
turn off "Driveway Floods" in 20
else
turn on "Foyer Chime"
turn on "Driveway Floods" for 2 * minutes
write log "Someone entering driveway - missed the ON"
end if
end if


The 'inside' Driveway Motion sensor:

This sensor will serve a double purpose in that not only does it sense incoming cars on the driveway, but also motion of a car leaving, and perhaps just someone walking around.

Here we have several things to check when we see the motion, but again we won't directly turn on the 'floodlights' that are part of the PR511.

The ON script here is the most important, but like the front motion scripts, the OFF script for a motion sensor should always make sure that the ON signal from the sensor wasn't missed by XTension for some reason.

As a rule, the OFF script for any motion sensor should make sure that the ON event wasn't missed, and if it was missed, then it should make an entry in the log to the effect, and perform some of the tasks that the ON script should have done.

The inside driveway sensor is here named "Front Walk Motion", and here are its scripts :

Front Walk Motion ON

--If motion is sensed at the front walkway

turn on "Front Walk Light"

--maybe someone's driving in?
if time delta of "Front Drive Motion" is greater than 30 then
turn on "Foyer Chime"
write log "Movement on the front walkway"
else
write log "Someone has arrived"
end if

Front Walk Motion OFF

--things get still again, we get an OFF
-- this is a backup, did we miss the ON ?
if status of "Front Walk Motion" = false then
turn on "Front Walk Light"

--maybe someone's coming in?
if time delta of "Front Drive Motion" is greater than 30 then
turn on "Foyer Chime"
write log "Movement on front walk, missed the ON"
else
write log "Someone has arrived, missed the ON"
end if
end if


Here there is little surprise, in that the scripts fit in with those of the "Front Drive Motion" and likewise use the "time delta" of the other sensor to determine whether someone is going or coming. Even humans sometimes have trouble with this!

The time delays must of course be 'customized' by you for the amount of time it takes to drive between the two sensors, and how long you want the lights to stay on.


The Garage Door Lock

Here we put an appliance module between your door opener and its power, and this is potentially a safety hazard, should you need to get out of the garage through that door.

So let's make the X-10 address the same as one of the ones that we can send from any of the handheld wireless controls, and make sure both that there is one of these in the garage, and that there is a nearby wireless transceiver (like the TM751), which can receive the wireless command.

This 'nearby' wireless transceiver will also be used as part of your everyday system, not just for emergency exit. This transceiver, will relay a signal from a "keychain" remote in your car, which will tell your system that it's really you coming home at this odd hour, and that it's OK to 'unlock' the garage door. (You still have to push your 'genie'...)

Once you've parked the car and gone inside, your system will again 'lock' the garage door. You want this also to occur shortly after you've gone.

Although the "Garage Lock" will be automatically turned on or off by the wireless remote, we need to have a pair of scripts which both record and "validate" these commands.

Garage Lock ON

--This is an appliance module which controls
-- power to the motor for the door opener.
-- If this is not enabled, the door cannot open.
--There should be a wireless transceiver on the same
-- house code so that the door can be enabled
-- without the computer, but can be controlled
-- by XTension and your scripts

write log "The garage door is unlocked"
Garage Lock OFF

--Someone has sent a command to lock the door

write log "The garage door is locked"


For example: You come down the drive, tripping both motion sensors, stop, press buttons on the X-10 remote, and then the 'Genie' remote. The garage door opens. Everybody's happy, even if the computer is dead.

But during the day, should someone try to force the garage door open, we know that the garage is locked, and this is a good reason to sound some sirens and call the gendarmes.

There are other things we can do with the control of the door lock, but let's move on to the other part of the door system, the scripts for the "Door Open" sensor.


The Garage Door Position Sensor

This is somewhat misleading in that we are really only able to determine whether the door is completely closed, or rather that the magnet is close enough to the switch to close the contacts.

Assuming that this switch is well mounted, we now have a good way of determining that the door is not closed, and in this simple example, it is best used as part of the alarm system. In the next tutorial we will take control and even be able to open or close the door from XTension.

In the ON script here we only test whether it is OK that someone be opening the door. If the door is locked, then obviously someone doesn't know what they're doing, so this is a good reason to sound an alarm, whether you're home or away.

Garage Door Open

--This script monitors the Garage Door
-- If it goes ON, the door is OPENing
-- Whenever it's status is true, the door is open

if time delta of "Door Open" is greater than 20 then
write log "The Garage Door is opening"
turn on "Foyer Chime"

-- if the door is locked, then what's up ?
if status of "Garage Lock" is not true then
write log "Someone is forcing the garage door open"

end if
end if

Garage Door Closed

--whenever the garage door closes, we get an OFF
-- this says that the door has just closed.
-- if the status tests False, the door is closed

if time delta of "Door Open" is greater than 20 then
write log "The Garage Door is now closed"

-- if the door is locked, then what's up?
if status of "Garage Lock" is not true then
write log "Someone is forcing the garage door"
end if
end if

Notice the "if time delta" verb above. It is used here to make sure that if the wind is blowing on the door and causing the magnet/switch to rattle and thus we get false alarms. You will need to increase the 20 (seconds) delay if you have a lot of wind or a shakey door.

But, the lesson here is the usefulness of the verb and the scripting technique. You'll find that there are many uses for this and you should review that section of the XTension manual.

We also haven't addressed the possibility that the garage door didn't close, and it may be left partially open but 'locked'. We'll tighten things up with the next instalment.

A script that says "I'm out of here" :

Now let's make up a pair of global scripts which will be useful in the mornings when you are finally ready to leave for work, or anytime you are leaving the house empty.

Actually it's a better idea to create two scripts. The "I'm Leaving" script really is supposed to give you some time to leave before the house is armed. All it does is cause another script to be executed in ten minutes.

By making this two scripts, we can take advantage of the "Guard the Home" script at other times, such as if you forgot to push the button before you left. You might want to call in on the cell phone and tell XTension to "Guard the Home" immediately.

I'm Leaving

--This script runs when you're leaving the house
--Unlock the garage door for a while and
--let's give ourselves some time to get out...

turn on "Garage Lock"
execute script "Guard the Home" in 10 * minutes
Guard the Home

--This script will set the house into "ARMED" mode
-- It should only be set when the house is empty.
-- ( pets are another item...)

write log "All sensors are now armed"
block unit "Foyer Chime"
unblock unit "Rear Porch Motion"
--
--in this example, this is all we will do.
--later we will also want to close the garage door

turnoff "Garage Lock"


The "I'm Leaving" script runs whenever XTension receives a certain X-10 command (from a wireless), but it could also be executed by a script that runs every workday sometime after you're supposed to have gone, and just makes sure that everything has been locked up, and the curlers are off.


What have we done ?

The lighting and alarm controls used here are very simple examples, and really they should be more generic by using "groups"of lights and alarms/chimes, and there are many more things to do when alarms do happen.

You might even be able to think of a way to let you know when you get home that either someone else is already home, or there has been an alarm while you were gone ...?

And, as usual, there may be holes in the logic of this tutorial such that lights might be left on, but this should be a good idea of how to get started. It's a simple but 'hospitable' system, and shows that this stuff isn't really that difficult.

We've also (hopefully) imported the 'plug-in' and actually seen all the windows and unit scripts, and should now have a pretty good idea about navigating if you didn't already have.

The next tutorial goes deeper into the scripts that coordinate more driveway motion sensors, and control of the garage door from your system. You will certainly want to import that system rather than key in all the scripts.


Home
Back to Home Page
more
Tutor Index
Home
Let's go for another one !


Copyright 2007, Sand Hill Engineering Inc. All rights reserved.

Mac Made

Last modified: May 8, 2002
Michael Ferguson, webmaster@shed.com