
How to Set up Multiple X-10 Wireless Cameras for a Web Surveillance System
You all have seen the X10 advertisements for the wireless cameras
(wide angle, instant on, night vision, etc.). Here's how you can use these cameras
without any additional software other than XTension and Oculus 3.0 to have a
multiple camera setup which allows you to send the pictures to your web site
for remote viewing, and also to use the cameras a motion-sensing security cameras,
which you can also monitor via a web browser.
(You may also want to check out the other camera tutorial)
![]() What You Need
What You Need
Macs
You will need a Mac that can accept the RCA video output from the X-10 camera receiver. That receiver will accept transmissions from any camera that is turned on (and it will only receive one transmission if more than one camera is on). This can be the same Mac that runs XTension, but for me I found using another Mac just for video to be preferable than overburdening the XTension Mac). I call these Macs "Video Mac" and "XTension Mac".
Software
XTension and Oculus 3.0 (shareware)
Cameras
Three X-10 instant on cameras and one video receiver. I'm using X-10's "instant on" cameras to be sure the camera is ready when switched on by XTension. The non-instant on variety might also work, but you may have to build some type of delay in the "Cams" switching script (see below).
Web Page to Display the Photos
You will either need a web page with ftp access or run your own web server. I use the XTension Mac as a web server using Quid Pro Quo. If you run your own server on your LAN, you will be transferring the photos from the Video Mac to the web server via ftp (if you're running a Linux or other server) or file sharing (if you're running a Mac web server).
Internet Stuff
The Video Mac must have a way to transfer files to the web server,
whether by file sharing or by ftp. When Oculus takes a picture of a window,
it automatically saves the file to the location in the Settings > Photo
dialog as discussed below. That location must be available for saving when the
picture is taken. The simplest situation is to have one of your Macs on a LAN
be the web server with an always on internet connection (like DSL). Then, transferring
files is a simple matter of mounting the web server volume on the Video Mac
and saving the file to your image directory for your web page. The next simplest
situation is to have the Video Mac with an always on Internet connection. Then,
you will transfer files to the image directory on your web server via ftp. If
you only have a dial-up connection, you will need to find a way to first get
the connection to the Internet going. See the XTension user group email archives
for some hints on doing that.
![]() Setting up Oculus
Setting up Oculus
Oculus is run on the Video Mac. In Oculus, you will set up a "camera" for the X10 receiver and "windows" for each of your cameras. The XTension "Cams" script (discussed below) will refer to each window by name when taking pictures for each camera.
To set up the "camera" in Oculus, go to the WebCam menu and select "Cameras". Add the video source where you have the X10 camera received plugged in. On my system, I use the video input on an ixTV TV card (on the Video Mac):

You will then set up a window for each camera you have. Each window will then have its own settings where to save the file, the size of the photo, etc.
We will set up the window for the "Living Room Cam" first. In the "File" menu, select "New" and a new window will open. Select that window and your menu choices should change. You will be using the "Settings" and "Captions" menus.
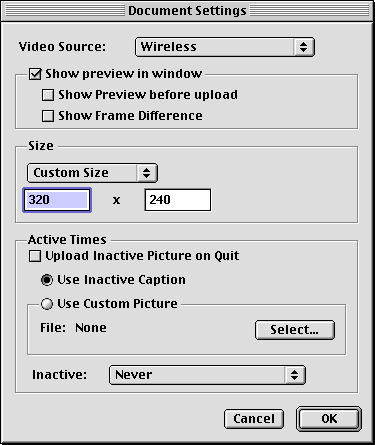
Settings > Document should look something like this (you can vary the picture size - the larger will just take longer to upload/download, but will show greater detail):
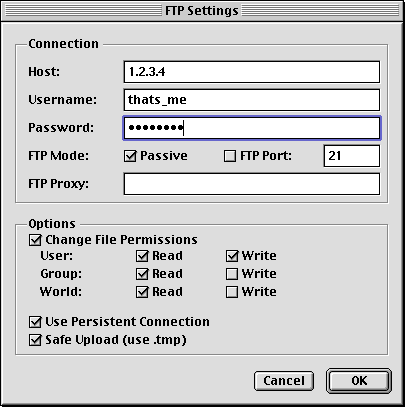
Settings > FTP should look something like this (using your ftp server's IP address, username and password):
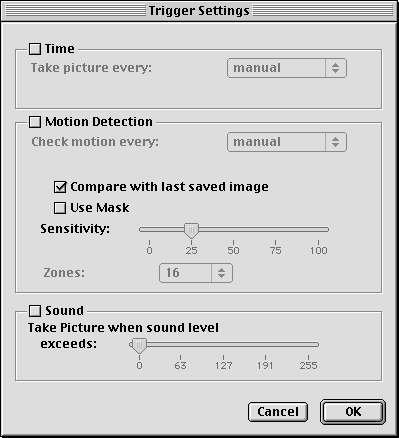
Settings > Trigger should look something like this (note that the "Time" and "Motion Detection" boxes are unchecked. XTension will handle the timing):
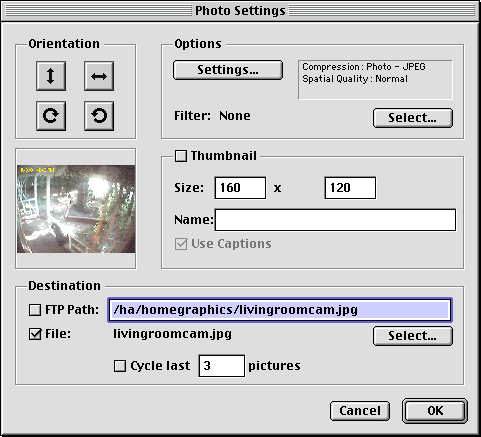
Settings > Photo should look something like this.
You basically name the file as a jpeg for the image name you have already set
up on your web page which will display the file
In order to be sure my photos are saved correctly, I make sure the web server volume is always mounted on the Video Mac using the following stay-open AppleScript application called "Mount Web Server":
property minutes_to_check
: 15
on idle
try
tell application "Finder"
mount volume "Web Server" on server "XTension Mac" as user
name "thats_me" with password "youbet"
end tell
on error
end try
return (minutes_to_check * 60)
end idle
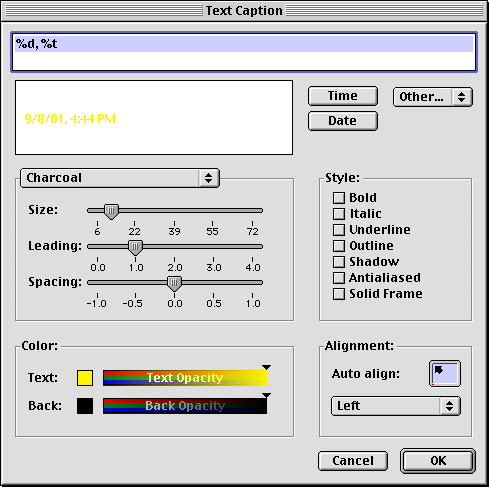
Finally, you'll want to time/date stamp each photo.
In Captions
> New Text Caption create your time and date caption:
That should be it for this Oculus window. You will then set up a new window for each camera you have. Be sure to save each window. I use the naming scheme "Living Room Cam", "Front Door Cam", etc. for each camera window. Be sure you keep all windows open on the Video Mac, as the XTension global script sends Oculus a message referring to windows by name (see the "Cams" script above). I used Keep It Up to be sure these windows stay open, and open when the Video Mac starts up.
After you plug the cameras in, hook the video receiver into the Video Mac, and finish setting up all windows, you should have several windows in Oculus open, all showing one picture.
![]() Setting up XTension
Setting up XTension
You will do four things in XTension: 1) Set up a unit for each camera you have, 2) set up a group for all cameras, 3) set up a global script to do the camera switching and photo taking, and 4) creating a scheduled event to time the photos.
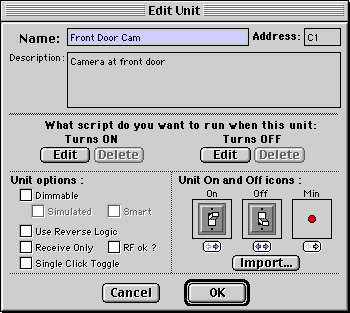
(1) Setting up camera units.
Create a new unit for each camera.
I use a separate housecode for all cameras to keep things organized. There are
no on or off scripts associated with any of the cameras - the global script
takes care of that. I have set up three camera units: "Front Door Cam",
"Living Room Cam" and "Kitchen Cam" (which names correspond
to the names of the Oculus windows for each of the cameras).
(2) Next, create a new group called "Cam_Group"
(or
any other name which you will use in the "Cams" global script).
Global Script "Cams"
turnoff "Cam_Group"
turnon "Living Room Cam"
try
tell application "Oculus 3.0" of machine "Video Mac"
activate
takepicture of window "Living Room Cam"
end tell
on error
end try
turnoff "Cam_Group"
turnon "Kitchen Cam"
try
tell application "Oculus 3.0" of machine "Video Mac"
activate
takepicture of window "Kitchen Cam"
end tell
on error
end try
turnoff "Cam_Group"
turnon "Front Door Cam"
try
tell application "Oculus 3.0" of machine "Video Mac"
activate
takepicture of window "Front Door Cam"
end tell
on error
end try
If you have more cameras, just add more script sections as above.
NOTE: You must have Oculus running on the Video Mac with Program Linking enabled
(do a "Get Info" and "Sharing" on the Oculus application).
Otherwise, XTension won't allow you to save this script.
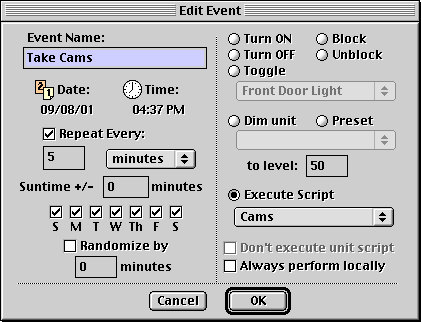
(4) Next, create a new Scheduled Event called "Take Cams".
Here is where you set the timing of running the "Cams" global script.
I have mine set to update the photos every 5 minutes:
If you have a dial up connection and will be transferring files via ftp to a remote web server, you may have to either add to the "Cams" script something that opens the dial up connection on the Video Mac, or have a script on the Video Mac that opens the dial up connection before XTension sends the take picture commands to Oculus.
That's it for XTension. Every time the "Take Cams"
event occurs, it executes the "Cams" global script, which first turns
all cameras off, then each camera on, takes a picture, and goes to the next
camera.
![]() Setting up a security camera
Setting up a security camera
The previous sections describe how to periodically snap and upload pictures,
but if you want to take pics based on certain motion sensor events, here's how:
(1) Add a security camera feature to this setup :
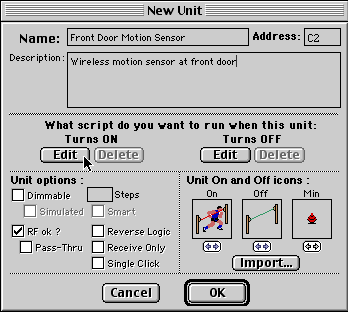
You will then add an "On" script for the sensor as follows:
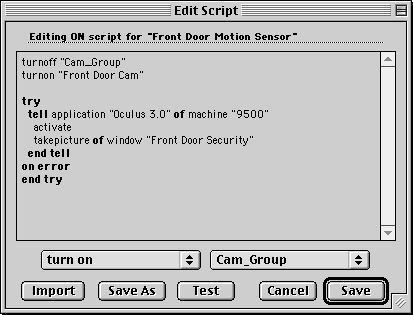
(You will need to substitute a different machine name ...)
Next, create a window in Oculus called "Front Door Security" just like the other Oculus windows, except the Settings > Photo dialog will look something like this:
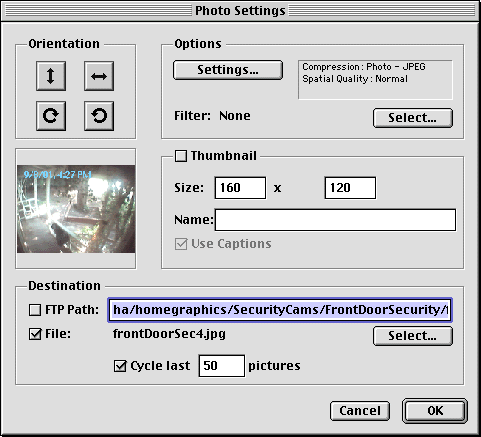
Note that the picture size is smaller and it cycles through the last 50 pictures. On the web page for this camera, I have a 5 column, 10 row table with image tags such as <img src="frontDoorSec1.jpg" width="160" height="120">, <img src="frontDoorSec2.jpg" width="160" height="120">, etc. Oculus will add the number to each photo consecutively (up to 50 and then start at 1 again).
Finally, set your Hawkeye to a place where the motion will first be detected to give XTension enough time to turn on the camera right when whatever triggered the motion detector is nearest the camera.
| Back to Home Page | Tutor Index |
Copyright 2007, Sand Hill Engineering Inc. All rights reserved.
![]()
Last modified: September 10, 2007
Michael Ferguson, webmaster@shed.com